Saturday, October 9, 2010

Vintage Goodness

Hi There Blogging Friends! Recently; I joined Mary Green's 'Collage Coterie' On-Line Class and was delighted to be introduced to a new friend. Our first lesson was to create a torn paper background then brush "GESSO" over it to create an aged look.

I had seen Gesso being referred to during other instructions but I used to just ignore it and use white folk art paint instead.

However; this time I felt it was time to discover this "new friend" and I am glad I did.

Below is my first attempt at the lesson; I used a paper mache tag then; covered it with my torn papers and brushed them over with Gesso. I love the way the Gesso gave the background a bit of a "spooky" look. The second part of the lesson was to work with appropriate image sizes for the piece of art so; I chose this sweet little girl who is heading off to bed with her favourite toy. I think her daddy is saying "Good Night and God Bless" and she has turned to acknowledge him. Or....maybe a ghostly figure whispered that!!!


My second attempt was also on a paper mache tag. This lesson wasn't so much about using the Gesso; it was about adding charcoal smudged edges to the images to make them stand out more.

I had worked on my tag and all was well.....but then.......I accidentally slopped a blob of Gesso onto my Bride's dress...oh dear.....I tried to remove it but it got worse.....I wiped a hole in the paper image!

So; after a bit of wondering what to do I grabbed a good dose of my new friend "Gesso" in a brush and completely covered the bride's dress then; I swirled a pattern all over with a pin. A few dots of Gesso on the bridal veil and the image was saved. You see; Gesso allows you to sculp a little....why didn't I go buy this fabulous product before ???

I am so looking forward to doing more of Mary's course to discover more new friends.

This love of the mixed media vintage look; which includes paper, fabric, stamping, chalks and inks is running through my veins at the moment....I can't get enough of it!

I love surfing the net to see what everyone is doing and recently I came across a gorgeous blog; Cape Cod Rambling Rose, which is operated by a very nice lady by the name of Louise. I fell instantly in love with a piece of Louise's work; so I purchased it from her Etsy shop. It is just so nice to see other people's work up close and I love Louise's book of fabric, lace and paper.


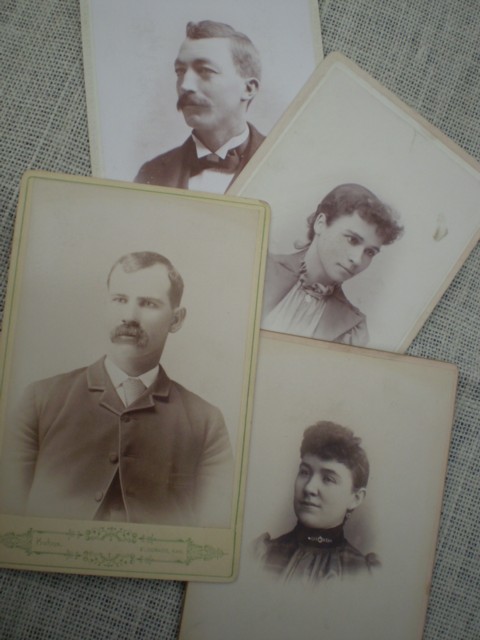
Louise also sent me these divine antique 'Cabinet Cards' . What a joy it is to see these up close....I haven't seen anything like them here in Australia...have you?


All this vintage inspiration got me very excited this past week, so my dear friend Sue and I went "op" shopping to seek out vintage finds.

This is what we brought home.....


beautiful cut-out work...


delightful cotton hand towels...


and "lotsa" lace and damask cloths...mmmmm they are nice!

All have been washed and ironed and are ready for me to make something special out of them.

Do tell....what is your latest vintage love?


Monday, September 27, 2010

'Birdcage - Weekend Sew-In'

Did you join in the 'Birdcage - Weekend Sew-In' with Jennie and Wendy ??

I did......here are some pics of my "Bling Birdie" which I designed especially for the fun weekend.

I love her!


Can't wait to see what YOU came up with!

Monday, March 1, 2010

Opening Mail and A Sewing Tip

The mail has arrived with some delightful things that I have been waiting for; so I thought I would share them with your.
My latest "must have" book is once again from The Book Depository and is; 'The Cozies (2)' which is published by the Guild of Master Craftsman Publications Ltd.

For the creation of this book, competitions were held by the UK 'Knitting Magazine' asking readers to design and make cozies especially for publication and this is their second book.
Wow...what talent exists out there..I am in love with these cozies and can see myself sitting by the fire during our upcoming winter with needles and yarn in hand;
Black and White......soooo classy!


A Garden one....and oh so magical;


Strawberries...yes please!


Cupcake will always be a favourite.

THEN.....there was my parcel from Winterwood.....oh my; I love this dreamy pure wool felt; I am building up my collection of colours in this gorgeous felt and am "itching" to create something with them.....got any suggestions????


NOW.....I was once again sewing my current 'leftover challenge' project for the publication in the Handmade magazine later in the year and I thought....wonder if you all know about this little trick I use when sewing close to buttons and beads......??? Probably not so here it is;


Place a thin piece of cardboard over the beads or buttons just before you approach them with the sewing foot on the machine. I just use whatever cardboard is at hand....this is a piece off my favourite coffee box, 'Nescafe Cafe Menu' Hazelnut Latte...yum;

Leave a gap big enough for the needle to sew through. Hold the cardboard firmly to allow the foot to climb onto it and continue sewing as normal:


The foot will slide along the cardboard like a skateboard sliding on concrete and the buttons or beads won't suffer any damage or jamm the foot;


There you are.....no stress!
Hope you are all having a nice Monday.....would love to hear what you are up to...opening interesting mail perhaps ???

Wednesday, February 24, 2010

Meeting a Legend !

Last Saturday I had the opportunity of meeting the delightful Bronwyn Hayes from Red Brolly. Bronwyn is one of the few Designers, who pioneered the combination of stitchery work and patchwork in Australia; creating her memorable quilts which we all know and love.
The softly spoken Bronwyn is as charming as her design work and it was such a joy to meet her.
The girls from 'A Quilters Hive' made this possible by inviting Bronwyn to be in attendance at their stand at the Newcastle Craft Expo; thank you girls.....


Candy also thrilled me with this gorgeous floral trim on this pretty cushion. Alas it was completly sold out by the time I got to the stand, but I'm assured that as soon as it comes in, it will be on the Quilters Hive Website for us to grab a few metres....can't wait!


this was another gorgeous trim that made my heart stand still........Candy sent me home with a piece to experiment with...thankyou sweetheart;

The girls also told me that they will be hosting a Quilters Retreat, commencing Friday 20th August, 2010 at the EcoPoint Myall Shores Resort, which is in the Great Lakes/Forster area
of NSW. The fabulous Libby Richardson will be the Guest Tutor, so if you have seen any of Libby's quilts i.e. 'Girls Day Out', Teddies Garden Treasurers' or 'Remember When', you will be drooling at the thought of a retreat with this wonderful Designer. Visit the Quilters Hive Website to make enquiries.....bookings are being taken now; so don't miss it;


The Craft Expo was an amazing event; isle after isle of stalls brimming with fabrics, papercrafts, beading, stamping etc, etc. Photographs are not encouraged so I am limited to the ones the girls from A Quilters Hive allowed me to take but.......one young girls was more than happy for me to take a pic of her cash register........isn't this gorgeous......talk about bling, every inch was covered with sparkling stickers!!!


Although I've been to Newcastle and back; I am still busy with my usual "secret sewing" for publication. So; when I was making a fabric frill this morning; I thought you might like to see how I make mine....here's a sneak peak of the project;


This is a single frill, so I have turned under both edges and stitched them down. Then; I placed a length of crochet cotton down the middle and sew a zig zag stitch, so that it steps over the crochet cotton all the way to the end.

This is how it looked when I finished sewing;

I secure one end of the crochet cotton then; pull the cotton and the frill gathers up;

It's an easy peasy way to make a frill....!

Wednesday, February 10, 2010

Romancing 'Rouenneries'

Have you seen it yet ??? The beautiful range of fabric called 'Rouenneires' by Moda! My friends from The Gum Tree Designers and I have........and.......we've not only been stroking and coooing over this wonderful bundle of fabrics; we've all been working on a special project with them as well.

Now you know how we love to tease you....well......I'm sorry but we are going to do it again !!! Here is a sneak peak of my work for the project;

got you wondering ?? That's good....lol ! All will be revealed very soon so keep visiting our blogs because you won't want to miss out on this exciting project.


Now....while I was stitching away on my part of the project, I got to thinking that you might like to know a couple of my stitching secrets.....well, not secrets really, but I don't think to tell anyone......so this time I have thought to share it with you.


A lot of people tell me that their embroidery threads knot and tangle all the time when they are stitching. Well......the problem is not with the thread itself...it is with the way we wrap them around our little bobbins to keep them nice and tidy. If you roll out thread from your bobbin, you will see kinks at every turn the thread made around the bobbin. The kinks are the problem!!!!


Your embroidery thread MUST BE smoothed out in one nice length before you commence splitting threads for stitching.......so......the answer is to IRON IT......yes; roll out the threads you are going to use on your ironing board and gently iron the kinks out....try it, I think you will be surprised at the difference it makes.

The other thing I would like to share with you; is how I start and stop my stitching, at the back of my work. This is when I am stitching with two threads on light fabric and I want to ensure that only the design line threads are visible.

Now; this is difficult for me as I am a knot it, knot it, knot it girl.......lol.....but; I do discipline myself to work like this when the stitching is for a special projects. It does use more thread and is slower...........and there are other methods that may work better in those areas; but I still like to know that my work is "blindly knotted" at the back....never to come undone.

This is how the back of my work looks;


The first step is to pull one thread from a length of thread that is twice the size of your arm up to the elbow (approx); and....as I have just said....the thread must be very straight...no kinks!


Step two is to thread the embroidery needle (I use Size 9) with the two ends of the thread together, thus creating a loop at the bottom;

Then; commence a stitch as normal...I am using a backstitch in the examples; so am bringing the needle up from the underneath side of the work but I do not pull the loop through to the front instead I catch it with my finger underneath and hold it;

then; I insert the needle from the front and come through to the underneath side. It will look like this;

now to complete the stitch; I put the needle through the loop and pull firmly to lock the threads together.


I always rock the stitch backwards then forwards to sit the stitch down nicely. Then continue stitching as normal;

At the end of your stitching line; I slip the needle through the previous stitch and create a loop;


then; I pass the needle through the loop and once again, rock back and forward to settle the knot into the stitching line;


finally......I run the needle and thread through the previous stitches; then cut the end off.


to continue stitching.....I separate the cut off thread then use one length at a time as before; to stitch smaller sections of the design.

Have I wet your appetite for stitching in red? Hope so; because we've got something beautiful for you to work on and it will be available very soon!

LinkWithin

Related Posts with Thumbnails